
Whether you exercise to stay healthy or to become the best version of yourself, exercise tests are a key part of your training.
You will learn how your body reacts to exercise, you can monitor your progress and you can optimize your training based on personalized training zones.
After the evaluation of cycling performance, we are going to zoom into running. More specifically, we’re taking a look at the physiological variables that have an influence on your performance during an incremental running test.
Using the Train.Red sensors will allow us to examine what happens on a peripheral level in your body, we’re not looking at your heart and lungs, but we’re looking at your muscles
For example, variations in the terrain have repercussions that are not detected by the classic performance tracking methods. If you want to learn more about this topic, take a look at what we discovered during the Zevenheuvelenloop.
The test we ‘re performing today is simple and can be performed by anybody. All you need is a flat surface like a treadmill, athletics track, or your local loop as long there aren’t any challenging hills.
All we need is a sportswatch with the Train.Red datafield or the Train.Red App, your running shoes and of course, the muscle oxygen FYER sensors.
You can download the data fields for Garmin devices that you find on Connect IQ by searching Train.Red in the store.
The key to accurate measurements
Researchers that are interested in running, mainly use NIRS sensors on the front part of the upper leg (vastus lateralis) as it is one of the primarily involved muscles in running. However, in some cases, it has been used on the calf (gastrocnemius) with similar results.
Using it on the upper leg, allows you to compare your muscles between running and cycling, crucial for triathletes.
(Remember that if you use the sensor in a place where sunlight is very intense you may need to use a Train.Red Patch.)

Ramp test protocol
The test can be carried out on an athletics track or flat road with a solid surface allowing you to maintain a presecribed pace throughout the test. If you decide to use a treadmill, we advise setting a slope of 1% to simulate the air resistance when running outdoors.

Step 1: warming-up
Goal of the warming-up? Systematically increase the muscle oxygen saturation (SmO2) as much as possible, preferably in the shortest possible time. The reason is simple: we want to ensure that oxygen delivery is as high as possible without fatiguing our body too much before the actual effort. The warm-up is a fundamental phase to unlock our potential and prevent injuries.
When using our Train.Red smartphone app you can use the Supply&Demand feature combined with Muscle States to guide your warm-up and come best prepared.
Step 2: the test
After the warm-up, the central part of the test can begin. Start by running at 8.5 km/h for 1 minute and increase your speed by 0.5 km/h every minute until you cannot sustain the effort anymore. It starts off easily but becomes intense very early on, so you’ll need to push yourself to your maximum. Positive feedback from a peer or trainer might motivate you to truly push your limits.
WARNING!!!
If your treadmill is not equipped with a safety system, be careful as it can be dangerous to perform an exercise till failure without a harness.
Step 3: cooldown
To recover, walk or jog slowly for at least 3 minutes. This will get your heart back on track and improve venous tone. Optionally add some stretching afterward.
We got data, what's net?
Let's move on to analyzing the test data. Ideally you want to visualize the SmO2 and speed over time. The speed will increase stepwise, whereas the saturation of the muscle will initially be relatively stable and then decrease. The moment we start to see desaturation is your 1st break-point. Towards the end of the test, we can detect the 2nd break-point in which SmO2 slows down the oxygen desaturation or even flatlines regardless of the increase in speed. The intensity of the activity can be divided into three distinct zones based on two break-points:
-
Homeostasis phase, during which the body can sustain the effort because oxygen delivery is matched with oxygen uptake.
-
Desaturation phase, when an increase in speed requires more oxygen than the circulatory system can deliver, leading to a decrease in SmO2.
-
Plateau phase, in which the aerobic system is fully activated and a further increase in intensity is coped with by anaerobic mechanisms.
By placing the sensors in different locations, we can observe distinct shapes in the SmO2graph, as the activation of specific muscles varies.
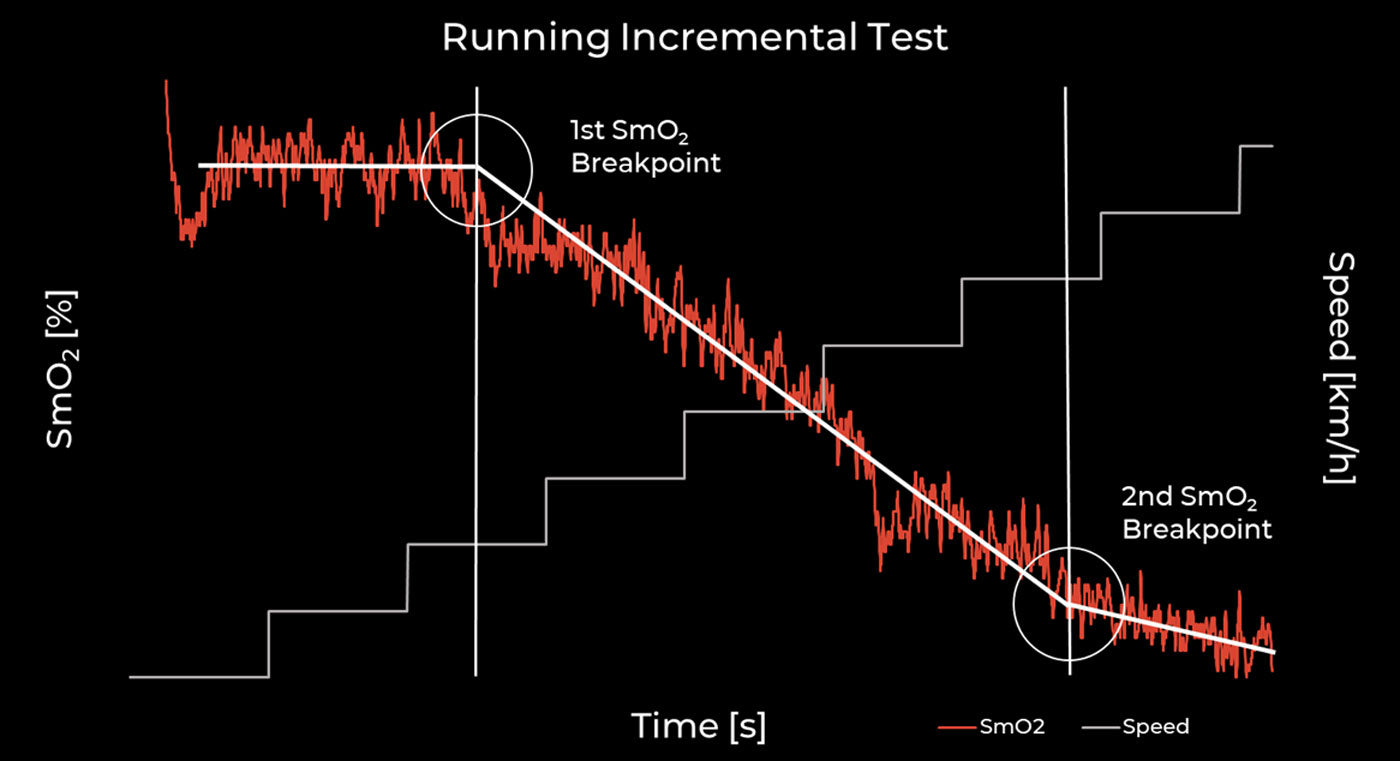
The speed maintained during the break-points can be used to define the training zones, even if as mentioned in the blog on 'ramp test in cycling' we must pay attention that although in the scientific literature, it is related to the ventilatory and lactate thresholds, they analyze different elements during the same event.
In a recent study Feldmann et al. found a good correlation between your ventilatory thresholds and NIRS breaking points.
IN SHORT
Periodic assessments allow us to track improvements, schedule workouts and come best prepared on race day. In a previous blog post, we covered training data and related race data from the Rotterdam marathon.
There is a clear synergy between muscle oxygen (SmO2) thresholds and the classic lactate and ventilatory thresholds, but there is not always a perfect correlation. This makes sense, as the modalities measure slightly different physiological biomarkers. The Train.Red FYER sensor measures how oxygen is consumed directly in the muscle.
You do not need a full laboratory in order to perform classical exercise tests.
All you need to progress your workouts and reach a higher level, is understanding the way your body uses oxygen during tests, training, and racing.

